Inspired by the popular 'Personal photos: the details only' thread in the Nostalgia forum proper. I would like to propose its 'model' equivalent.
A thread then, to share, compare and discuss (Between varying model types/scales) the technical/historical accuracy of those all important little details present throughout the model forms you possess.
An 'expose' then of the veracity or lack thereof of those unnoticed, overlooked and perhaps under appreciated details.
All types of model representation are welcome, Ready made, Scratch built, Modified/Kit bashed, or just plain good old fashioned 'to the letter' kit assembled models.
Whether accurate or inaccurate, the more innocuous, enigmatic or down right obscure the detail the better.

Models: Personal photos - the details only!
Started by
werks prototype
, May 11 2010 14:13
33 replies to this topic

#3

Hamish Robson
-

- 389 posts
- Joined: May 09
Member
Posted 12 May 2010 - 08:26
Nice! That's a 935 I think - is it a diecast or the Tamiya 1/12th?
Here's some.

Here's some.
#4
werks prototype
-
- 7,211 posts
- Joined: January 09
Member
Posted 12 May 2010 - 13:35
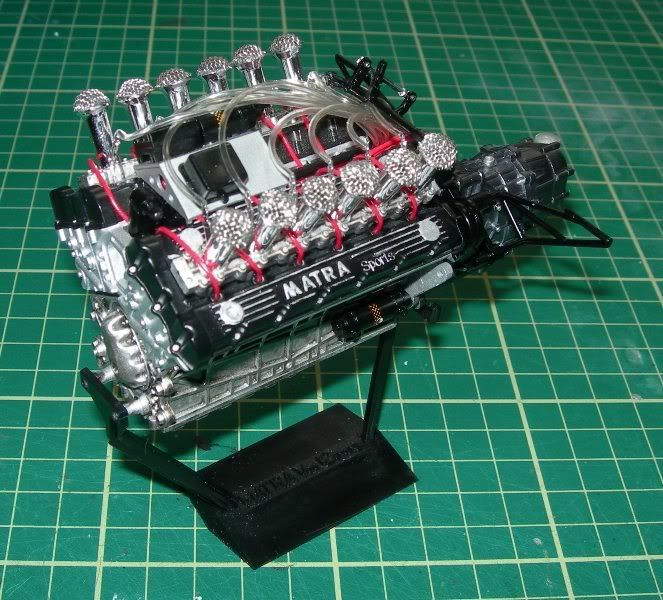
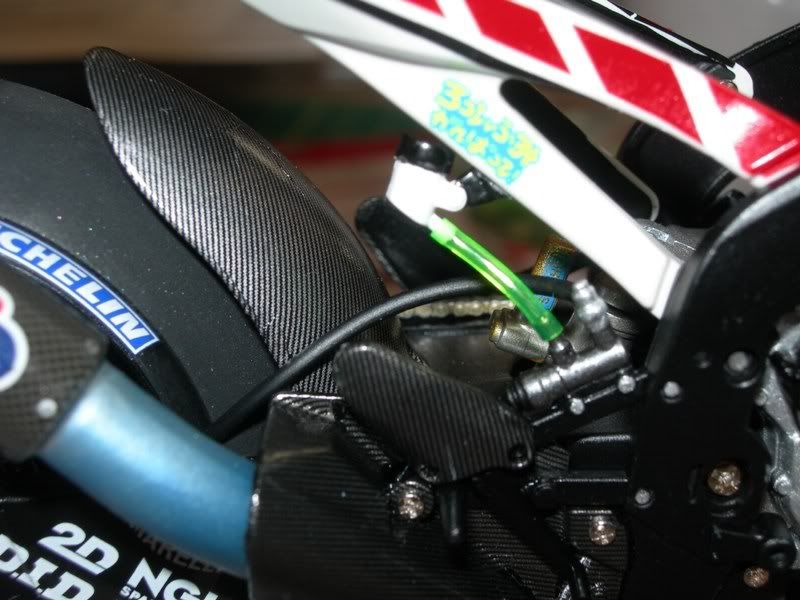
Great stuff there Hamish  . Is that Matra engine a standalone construction? And what is that rather interesting rear-assembly at the bottom of your post?
(The 935 is supposed to be the prototype of the car in question, a diecast/readymade 1/18 scale)
. Is that Matra engine a standalone construction? And what is that rather interesting rear-assembly at the bottom of your post?(The 935 is supposed to be the prototype of the car in question, a diecast/readymade 1/18 scale)
#5
Hamish Robson
-
- 389 posts
- Joined: May 09
Member
Posted 12 May 2010 - 14:28
Hi Werks,
The engine is out of the 1/12th Tamiya Matra MS11 - it comes with an engine stand and was nice to display before installing. The only non-kit parts I added were the air funnel meshes.
The rear end is the 1/20th Fujimi Ferrari 126C2 (1982 Imola) with some photo-etched brake detail and some engine wiring.
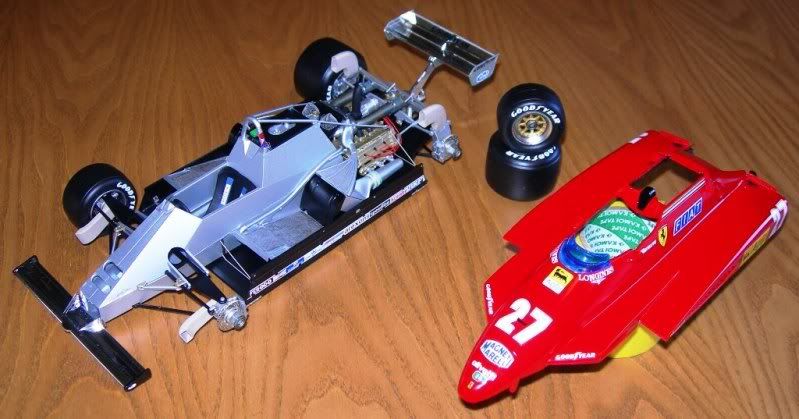
Thanks for your nice comments!
The engine is out of the 1/12th Tamiya Matra MS11 - it comes with an engine stand and was nice to display before installing. The only non-kit parts I added were the air funnel meshes.
The rear end is the 1/20th Fujimi Ferrari 126C2 (1982 Imola) with some photo-etched brake detail and some engine wiring.
Thanks for your nice comments!
#6
werks prototype
-
- 7,211 posts
- Joined: January 09
Member
Posted 14 May 2010 - 10:44
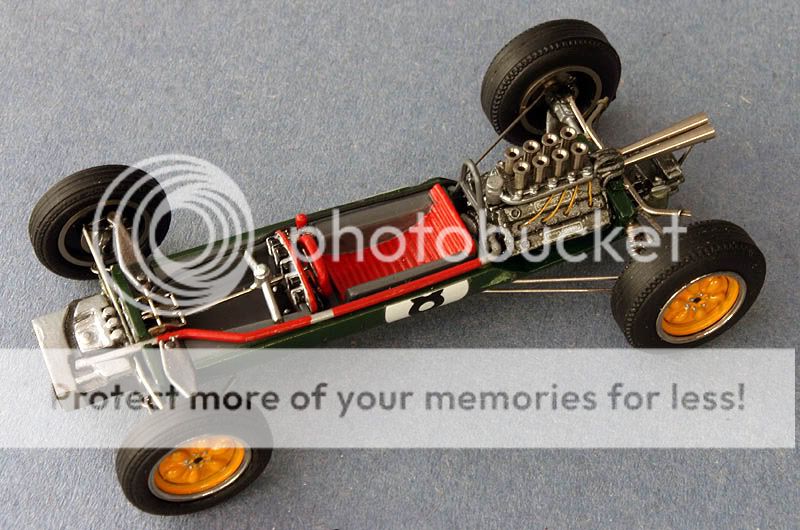
A detail of the rear of the McLaren M16B


Edited by werks prototype, 14 May 2010 - 10:47.
#8
werks prototype
-
- 7,211 posts
- Joined: January 09
Member
Posted 14 May 2010 - 13:37
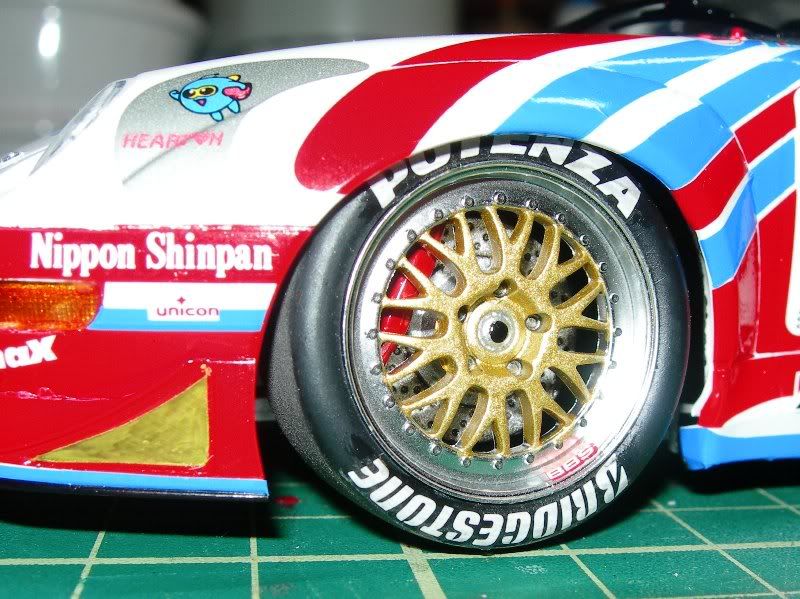
SOK sponsored 911 GT2! Very nice. Porsche must be the car of the infinite livery.

#10
werks prototype
-
- 7,211 posts
- Joined: January 09
Member
Posted 31 October 2010 - 22:22


Some more bits 'n' bobs.
#11
David Lawson
-

- 968 posts
- Joined: November 03
Member
Posted 07 November 2010 - 08:31
In the early 1990s I started building 1/43rd scale white metal and resin kits and being a life long Lotus supporter and glutton for punishment the very first 1/43 car I built had to be the Tameo Lotus 25. I'm not sure nowadays my old eyes and fingers could still manage with all the fiddly detail and tiny parts.
David
David
#12
werks prototype
-
- 7,211 posts
- Joined: January 09
Member
Posted 07 November 2010 - 08:41
Wonderful stuff!
Were you machining any of the parts yourself? It looks a little 'extra' special!
Were you machining any of the parts yourself? It looks a little 'extra' special!
Edited by werks prototype, 07 November 2010 - 08:42.
#13
David Lawson
-
- 968 posts
- Joined: November 03
Member
Posted 07 November 2010 - 18:25
I can't claim any credit for the detailing, this was one of Tameo's WCT range of more detailed kits.
David
David
#14
tbolt
-

- 155 posts
- Joined: May 10
Member
Posted 12 December 2010 - 14:56
Tamiya Yamaha YZR500, Kenny Roberts.

Did not add anything to this kit, removed wheel spokes and blurred front brake disc also blurred chain and rear sprocket


They used to sit on a turntable, one half was a garage the other a section of track,
built about 25 years ago the white paint has faded a little

Did not add anything to this kit, removed wheel spokes and blurred front brake disc also blurred chain and rear sprocket
They used to sit on a turntable, one half was a garage the other a section of track,
built about 25 years ago the white paint has faded a little
#15
tbolt
-
- 155 posts
- Joined: May 10
Member
Posted 23 December 2010 - 18:11
This site may be of interest, they offer PDF files for detailing all kinds of models.
http://www.modelersi...m/Pdf_notes.htm
http://www.modelersi...m/Pdf_notes.htm
#16
werks prototype
-
- 7,211 posts
- Joined: January 09
Member
Posted 30 January 2011 - 23:17
This site may be of interest, they offer PDF files for detailing all kinds of models.
http://www.modelersi...m/Pdf_notes.htm
That does look good.
I wonder if anyone can verify the quality of what you actually receive?
#17
tbolt
-
- 155 posts
- Joined: May 10
Member
Posted 31 January 2011 - 18:28
That does look good.
I wonder if anyone can verify the quality of what you actually receive?
I have purchased from them several times, have about ten items now, all have good quality photo's
don't forget to specify English text.
#18
werks prototype
-
- 7,211 posts
- Joined: January 09
Member
Posted 31 January 2011 - 18:48
I have purchased from them several times, have about ten items now, all have good quality photo's
don't forget to specify English text.
Ok! That is good enough for me. Thanks.
I had to laugh at their extra charge, instead of postage and packing, an 'online' specific variant called Bandwith and other fees! They are very cheap though, but I find this charge particularly imaginative!
Thanks again for the tip off.
I will get a few orders off.


Advertisement
#20
tbolt
-
- 155 posts
- Joined: May 10
Member
Posted 16 February 2011 - 16:12
Assuming the blue car is 1/24 that key must be about 3mm, did you make it ?
#21
werks prototype
-
- 7,211 posts
- Joined: January 09
Member
Posted 16 February 2011 - 18:53
Assuming the blue car is 1/24 that key must be about 3mm, did you make it ?
No I didn't make it.
 It is a ready-made. (Diecast) 1/18. The Mercedes 'Blue Wonder' race transporter. I only fairly recently noticed the ignition key myself as well as a little Bosch battery hiding underneath the chassis.
#22
Paglesham
-

- 64 posts
- Joined: July 09
Member
Posted 26 February 2011 - 14:17
Some may have seen this model before, but it's a new thread to me.
I had prime access to no less than five of the real things and chose the more authentic-looking Hill/Gurney one for the model. 1/12th scale, entirely scratchbuilt. I even did the (very complex!) drawings for it.

Cheers,
Martin
I had prime access to no less than five of the real things and chose the more authentic-looking Hill/Gurney one for the model. 1/12th scale, entirely scratchbuilt. I even did the (very complex!) drawings for it.
Cheers,
Martin
#23
Paglesham
-
- 64 posts
- Joined: July 09
Member
Posted 26 February 2011 - 14:47
Here's another 1/12th scale scratchbuilt. A McLaren M8F.


Martin
Martin
#24
werks prototype
-
- 7,211 posts
- Joined: January 09
Member
Posted 26 February 2011 - 19:58
Here's another 1/12th scale scratchbuilt. A McLaren M8F.
Martin
Incredible work, Martin. Proper engineering in miniature.
How difficult was it for you to get accurate geometry for the McLaren?
I have had terrible trouble trying to work out the geometry of the 'early season testing' Naca duct on the right flank of the M8F.
Anyway, wonderful stuff.
I hope you can share more of these genuinely sumptuous details!
#25
Paglesham
-
- 64 posts
- Joined: July 09
Member
Posted 26 February 2011 - 22:47
Thanks, werks!
I take it that by "geometry" you mean reference measurements, that sort of thing?
I had access to the real car at Scott Racing when they were in Brandon, Suffolk. They were restoring the car for a mystery man client from America, but it ended up being sold to a Dutch outfit.
Alas, one of the reasons that I haven't finished it is that I sold up my house and bought a baot to live on. When we returned after 5 years, I couldn't find all my pictures and most of my notes. I have retrieved some, including photos of the old bodywork and I have a CD of pics taken just before the car went. If I can find anything on it I will let you know.
After this amount of time I can't decypher most of my measured sketches!
I'm sure you know how complex a shape is an upright usually. Scott Racing let me take home a real one to work from!
I've just been warned that my "How to" feature on my friend's fotki site where the whole build so far is pictured may contain malware, so no pictures till we sort that out.
More soon.
Cheers,
Martin
#26
Paglesham
-
- 64 posts
- Joined: July 09
Member
Posted 26 February 2011 - 23:13
A couple more pictures of the McLaren M8F
Here's the battery holder at the right rear of the tub.

The opposite side of the tub with the oil swirl pot.

The plastic master of the Keith Black Big Block Chevy, bellhousing and Hewland LG600 gearbox.

More when we sort out the malware problem.
Martin
Here's the battery holder at the right rear of the tub.
The opposite side of the tub with the oil swirl pot.
The plastic master of the Keith Black Big Block Chevy, bellhousing and Hewland LG600 gearbox.
More when we sort out the malware problem.
Martin
#27
werks prototype
-
- 7,211 posts
- Joined: January 09
Member
Posted 27 February 2011 - 00:54
What wonderful craftsmanship! Martin, you are a real Pro!A couple more pictures of the McLaren M8F
Here's the battery holder at the right rear of the tub.
The opposite side of the tub with the oil swirl pot.
The plastic master of the Keith Black Big Block Chevy, bellhousing and Hewland LG600 gearbox.
More when we sort out the malware problem.
I take it that by "geometry" you mean reference measurements, that sort of thing?
I had access to the real car at Scott Racing when they were in Brandon, Suffolk. They were restoring the car for a mystery man client from America, but it ended up being sold to a Dutch outfit. Alas, one of the reasons that I haven't finished it is that I sold up my house and bought a baot to live on. When we returned after 5 years, I couldn't find all my pictures and most of my notes. I have retrieved some, including photos of the old bodywork and I have a CD of pics taken just before the car went. If I can find anything on it I will let you know. After this amount of time I can't decypher most of my measured sketches!
To be honest, I think secretly I do actually enjoy the research process and the general hunt for information anyway + I do have a few good books on the way. I do hope you eventually get to finish this particular model though.I'm glad you have even bothered to create such a thing, that is going to answer a lot of peoples questions. Brilliant stuff!I've just been warned that my "How to" feature on my friend's fotki site where the whole build so far is pictured may contain malware, so no pictures till we sort that out.
More soon.
Cheers,
Martin
Edited by werks prototype, 27 February 2011 - 01:00.
#28
Paglesham
-
- 64 posts
- Joined: July 09
Member
Posted 27 February 2011 - 10:07
Well, today, there appears to be no problem with malware, so a few more pics, but it is probably best
if I just give a link to the whole feature which you can read at your leisure.
http://public.fotki....h_step-by-step/
Please excuse some of the typos in the text!
Here is one of the front corners with the lower wishbone and coil over units assembled temporarily.

And the plastic patterns for the engine/gearbox placed up against the tub.

Now we are back from our canal travels, I will probably continue the M8F, bit by bit, to conclusion.
Martin
if I just give a link to the whole feature which you can read at your leisure.
http://public.fotki....h_step-by-step/
Please excuse some of the typos in the text!
Here is one of the front corners with the lower wishbone and coil over units assembled temporarily.
And the plastic patterns for the engine/gearbox placed up against the tub.
Now we are back from our canal travels, I will probably continue the M8F, bit by bit, to conclusion.
Martin
#29
Mal9444
-

- 1,292 posts
- Joined: December 05
Member
Posted 27 February 2011 - 10:37
Now we are back from our canal travels...
Martin
To this place, by any chance?

#30
Paglesham
-
- 64 posts
- Joined: July 09
Member
Posted 27 February 2011 - 13:42
No, Mal...here:-

Ain't no smacks on the Cut.
Martin
Ain't no smacks on the Cut.
Martin
Edited by Paglesham, 27 February 2011 - 13:44.
#31
werks prototype
-
- 7,211 posts
- Joined: January 09
Member
Posted 27 February 2011 - 13:46
I shall very much enjoy reading through this. This statement, from Page 2, #48, regarding the Model Oil Tank, is greatly comforting!Here is one of the front corners with the lower wishbone and coil over units assembled temporarily.
And the plastic patterns for the engine/gearbox placed up against the tub.
Well, today, there appears to be no problem with malware, so a few more pics, but it is probably best
if I just give a link to the whole feature which you can read at your leisure.
http://public.fotki....h_step-by-step/
Please excuse some of the typos in the text!
They are basically pieces of brass rod and tube soft soldered together with a soldering iron until they fit. There's no easy answer to this kind of work. It has to be looked at, tried out, fiddled with and adjusted with laborious repetition till it sits right and looks right.
How far South did you manage to get with that boat? My family are all from the West Midlands and I have heard tales of Canals as far South as Portsmouth! (Albeit a long time ago)Now we are back from our canal travels, I will probably continue the M8F, bit by bit, to conclusion.
Martin
#32
Paglesham
-
- 64 posts
- Joined: July 09
Member
Posted 27 February 2011 - 14:36
Hi werks,
I do hope you enjoy the text on the How-To. It's meant to encourage without fooling anyone it's too easy.
And of course it's how I do it. That don't make it right!
We went from the Welsh Canal down to Braunston where the old girl was built in 1937, then back up to the Shropshire Union, where we took her out and restored her. That is being finished near Hailsham in Sussex on a farm somewhere.
We saved her and did 80% of the work, but old bones have cried "enough"!
There were a few canals on the south coast but not many. Only the Wey and Arun Canal looks likely to be completed in restoration.
Cheers,
Martin
#33
asapiro
-

- 55 posts
- Joined: September 09
Member
Posted 07 April 2011 - 14:18
so nice to stumble upon this thread on a quiet morning in the office !
greetings Martin
looking forward to progress on your Mclaren
I've got to learn how to post pictures here so I can make proper contributions to the tread!
greetings Martin
looking forward to progress on your Mclaren
I've got to learn how to post pictures here so I can make proper contributions to the tread!
Hi werks,
I do hope you enjoy the text on the How-To. It's meant to encourage without fooling anyone it's too easy.
And of course it's how I do it. That don't make it right!
We went from the Welsh Canal down to Braunston where the old girl was built in 1937, then back up to the Shropshire Union, where we took her out and restored her. That is being finished near Hailsham in Sussex on a farm somewhere.
We saved her and did 80% of the work, but old bones have cried "enough"!
There were a few canals on the south coast but not many. Only the Wey and Arun Canal looks likely to be completed in restoration.
Cheers,
Martin
#34
sixlover
-

- 31 posts
- Joined: August 10
Member
Posted 13 April 2011 - 10:52
Hi aspiro,
glad to brighten your day at the office!
To post pics, set up your pictures in photobucket, for instance and then when they're up, keep photobucket open and start typing your post on TNF. When you want a pic, click the little icon that says Insert Image if you hover over it and a bar will come up with "http/" at the left end. delete that and go to the photobucket page, hover over "Direct Link" under your picture and left click. It has been changed recently and says "Copied". Go back to your TNF post and right click in that bar thing, then left click paste. The URL of your picture will be in there.
Finish your post and I always click "preview" just to make sure.
Good luck.
I may not get much done on the M8F this summer as I have a lot of stuff to do on the home and I must get my little daily driver finished, a Reliant Fox van, for which I am just finishing a complete engine rebuild. They might be cheap to run, but heavens, they ain't cheap on parts! I've spent over £600 on this little devil, but it's a fun little car and deserves a sweet engine.
Any questions on the "How-to" article mentioned above, please ask. Cyber modelmaking!
Martin


