
Is it one by your hand ?
Edited by macoran, 05 November 2009 - 18:16.

Member
Posted 05 November 2009 - 18:16
Edited by macoran, 05 November 2009 - 18:16.
Advertisement

Member
Posted 05 November 2009 - 18:55
Member
Posted 05 November 2009 - 19:42
Please don't stop !But, of course, I can stop share my collection
...
Member
Posted 05 November 2009 - 21:15
That would've been snazzy !! Did you do many HGV cutaways ?Wow! That was quick! Yes Marc, my own hand. I wanted to do the Military version as well, they considered it but then decided against it. Pity, it looked great with bigger wheels and tyres, gun racks, circular roof hatch and olive drab paint...
Member
Posted 05 November 2009 - 22:07
No. Just that and a couple of refuse vehicles, a 6x6 chassis, a fire tender chassis and a fire-engine cab.That would've been snazzy !! Did you do many HGV cutaways ?
Member
Posted 05 November 2009 - 22:12
Wouldn't mind seeing more, nowhere in the thread title says that it has to be a racing car.No. Just that and a couple of refuse vehicles, a 6x6 chassis, a fire tender chassis and a fire-engine cab.

Edited by macoran, 05 November 2009 - 22:18.

Member
Posted 06 November 2009 - 10:16
Hi ,
I am looking for drawings of CanAm cars (McLaren M8D, M8F, BRM P154, P167, Autocoast ti22, Ferrari 712M 1971, Lola t220, t260, Porsche 917 PA 1969, 917/10 1971, March 707, 717, Shadow 1970, 1971).
Do they exist ?
Many thanks, best regards !
André Acker.

Member
Posted 06 November 2009 - 13:09

Edited by Duc-Man, 06 November 2009 - 13:42.
Member
Posted 06 November 2009 - 13:19
Blimey! I hope the two scans were the same scale, but even that's probably not too much of a problem. Do you want the other bits?Sticking bits of DB3S together
Advertisement
Member
Posted 06 November 2009 - 16:10
If you work for a manufacturer you don't get to sign your work! I would say that is 100% CG work, whereas Dave Kimble's illustration (that I can't access) is line and airbrush.On the website it says: 'Image Copyright Porsche' but doesn't mention the artist.
Member
Posted 06 November 2009 - 18:04
If you are willing to scan I am game to patch and splice.Blimey! I hope the two scans were the same scale, but even that's probably not too much of a problem. Do you want the other bits?

Edited by macoran, 06 November 2009 - 18:05.
Member
Posted 06 November 2009 - 18:19
Edited by Tony Matthews, 06 November 2009 - 18:20.

Member
Posted 06 November 2009 - 20:50
I understand the problems Marc, but it is very difficult to ensure that the almost-A1 drawing is lined up square on an A4 scanner! Especially as I have to fold bits of it to get it under the lid, then try not to crop the scan and get a slightly different scale - I'll do my best.
I didn't know you spoke Draconian! Is there no end to your talents?

Member
Member
Posted 07 November 2009 - 00:14
Edited by macoran, 07 November 2009 - 00:26.
Member
Posted 07 November 2009 - 18:07
Member
Posted 07 November 2009 - 20:42

Member
Posted 08 November 2009 - 13:44


New Member
Posted 08 November 2009 - 19:58

Edited by Daytona 935, 08 November 2009 - 19:58.
Member
Posted 09 November 2009 - 22:14
Heres a novelty. The Cosworth DFY engine drawn by a woman!!!! Diana Stevens. Now I'm not sexist but in my professional career as an illustrator I have only ever come across one woman illustrator and she switched to admin. Does anyone know of work by any other women illustrators?

Member
Posted 09 November 2009 - 22:35

Member
Posted 10 November 2009 - 00:17


Member
Posted 10 November 2009 - 00:21
 I actually had forgotten that we hadn't done the DFVs yet
Member
Posted 10 November 2009 - 00:41
Member
Posted 10 November 2009 - 00:43
I didn't realize so many different illustrators had done the DFV. I was going to but decided the DFX was more interesting as it was fairly new at the time, and I was trying to get into the Indy Car market. It's interesting that Diana Stevens is the only one to show the central vibration damper, involving lots of little torsion bars - difficult to make out at that resolution, but I'm sure they are there! Theo Page's cutaway was, I think, the first of the DFV, cetainly the most used illustration, although Vic Berris' looks 'older', almost Victorian! They may have been done before the vibration damper was installed, it wasn't used initially, only introduced after timing-gear tooth breakage problems showed up.
Member
Posted 10 November 2009 - 00:56
Member
Posted 10 November 2009 - 01:02
I think I have one somewhere, I'll look after getting some shuteye firstA better scan of the Vic Berris's DFV is welcome.
Ibsen
Member
Posted 10 November 2009 - 01:11
I've put them on screen side by side and I think you are correct !The Keith Harmer's DVF is a coloured mirror of the Diana Stevens's one, or am I wrong?
Ibsen
Advertisement
Member
Posted 10 November 2009 - 01:19
I think so too, but at the moment I can't access the larger views, so I'm looking at postage stamps. I thought you were going to bed Marc!I've put them on screen side by side and I think you are correct !

New Member
Posted 10 November 2009 - 09:50
The drawing begins with a 3-mil, frosted sheet of mylar drafting film taped onto a sheet of foam core board. The foam core board allows the drawing to be moved as necessary for best access to the area being worked on. The mylar surface responds extremely well to pencil. I use .3mm 2H and 4H lead in a mechanical pencil. The first layer of mylar is only used to draw the perpective grid for the subject.
is this new sheet of mylar frosted as well? It can be seen through well enough over the perspective plane/ base drawing?Once it is complete and registration marks are added, a new sheet of mylar is taped over it and the actual drawing begins.
again, all of these layers of mylar are of the same material, frosted mylar, same 3-mil thickness?When the draft drawing is complete, a new sheet of the same type of mylar is taped over it and an inking is made using a 0.18mm Rapidograph. ( 0.12mm for tiny bits)
I'm assuming the litho film positive is on a clear sheet of acetate?Next it's off to printer to have a litho film-positive produced. You must specify that the finished piece of film is made as clear as possible since it will become the medium for the painting. At times, I've had to have two or three films made before getting an acceptable one.
The film is now flipped over (wrong reading) and taped onto a fresh piece of foam core board and the airbrushing begins using gouche. The advantage of the film is that if a mistake is made, it can simply be washed away with a paper towell and a touch of saliva. This process can can repeated over and over without anyone ever knowing you messed up. Generally, the basic painting is all done on the back side. When it is near complete, the film is flipped back to the front and fine tuning begins. Color and value adjustments are made without disturbing the core painting on the back side.
Additional layers of film can be added as overlay paintings as needed. For example, graphics, color schemes or component parts such as different engine covers.
Hope this helps.
Edited by VisualHomage, 10 November 2009 - 09:57.
Member
Posted 10 November 2009 - 10:41
Yep, the colour version has just been flipped! So, completely wrong, cylinder offset wrong, gears wrong, pumps wrong - a waste of effort. The way Mr Inomoto exaggerates is not my way, but it is acceptable, I think, because he does not pretend that his illustrations are completely accurate. But to produce artwork that is so far wrong - I just can't see the point. You can use an existing illustration - with permission, hopefully - but you should alter it to make it work as technical illustration!I've put them on screen side by side and I think you are correct !
Edited by Tony Matthews, 10 November 2009 - 15:21.

Member
Posted 10 November 2009 - 15:16
Edited by Tom Johnson, 10 November 2009 - 15:24.
Member
Posted 10 November 2009 - 15:31
Did you use the Frisk film 'straight' Tom, or reduce the tack even more? Obviously there is no risk of roughening the surface or even ripping it as there is on paper, but it occured to me that it might adhere a little too well on film! One of the few tips I was given was from a friend who was a Graphic Designer for 'Motor' magazine amongst others, and he described how the airbrush artists rubbed the tacky side over the edge of their desks to remove some of the adhesive. I ended up using my knee, well-washed denim stretched tight, the occasional minute fibre was not a problem.Forgot about the frisket. I use 'Frisk' brand low-tack frisket.

Member
Posted 10 November 2009 - 15:43
Did you use the Frisk film 'straight' Tom, or reduce the tack even more? Obviously there is no risk of roughening the surface or even ripping it as there is on paper, but it occured to me that it might adhere a little too well on film! One of the few tips I was given was from a friend who was a Graphic Designer for 'Motor' magazine amongst others, and he described how the airbrush artists rubbed the tacky side over the edge of their desks to remove some of the adhesive. I ended up using my knee, well-washed denim stretched tight, the occasional minute fibre was not a problem.
Member
Posted 10 November 2009 - 15:57
Alan, I stopped doing the pencil work on CS2 and then painting over it a considerable time ago - for the very reason you mention! That's why I'm able to post bits of construction work, it was all done on drafting film. It was then pressed through, giving a pristine painting surface and thin grey (or red) lines to paint to. It wasn't an overnight switch, it started with small, complex areas being drawn on film, untill I realised I could do the complete cutaway on film first. I think the Penske PC17 was the first complete film drawing - so 1988.I've never really been able to work the way Tony does, by using the same surface for the pencil construction and the final rendering. By the time I'd finished the pencil work the surface would be knackered. I always did the construction on tracing paper and pressed it through to board for the final piece...even then I could still make a mess of it.
Edited by Tony Matthews, 10 November 2009 - 15:57.
Member
Posted 10 November 2009 - 16:13
Did you use the Frisk film 'straight' Tom, or reduce the tack even more? Obviously there is no risk of roughening the surface or even ripping it as there is on paper, but it occured to me that it might adhere a little too well on film! One of the few tips I was given was from a friend who was a Graphic Designer for 'Motor' magazine amongst others, and he described how the airbrush artists rubbed the tacky side over the edge of their desks to remove some of the adhesive. I ended up using my knee, well-washed denim stretched tight, the occasional minute fibre was not a problem.
Member
Posted 10 November 2009 - 17:25
With time, I found it best to simply not to leave the frisket on for more than a couple of hours, especially if it was hot and humid in the room.
 Low tack turns into Araldite in the blink of an eye!
 This required that I work in small areas at a time, with multiple applications of frisketing to get the job done. It also meant using an awful lot of the stuff! A typical 24" X 36" illustration would need about three rolls of frisket.
Member
Posted 10 November 2009 - 17:30
THREE rolls? Wow, Tom, I hope you had shares in Frisk! Assuming the same size rolls as in the UK - I reckon I could get several full-airbrush illustrations out of one roll. Thank goodness I don't have to do it anymore, although once I'd got into the routine I quite enjoyed it, and it could be quite exciting peeling the mask off to reveal a pristine bit of new illustration.
PS I'll check the roll size - I've still got one somewhere, along with enough drafting film for another 50 cutaways...
Member
Posted 10 November 2009 - 17:53
I don't remember that Alan - perhaps they got it after I left - bastards! Not that we were allowed to use the airbrush much, but a nice set-up, all those little recievers along the worktop under the window. I 'rescued' an early DeVilbiss compressor from MN when I left, green rather than maroon, very Victorian, but then I bought a Hydrovane, as I wanted to run air tools off it as well! I feel sorry for anyone trying to airbrush using canisters, as Mr Coleman said, the money made from mustard comes from what people leave on their plates - I reckon 90% of the air is used cleaning the brush between reloads.I've spent a fortune on Frisk film and DeVilbiss Airbrush needles over the years:eek:
When I was at College in Luton they had this massive roll of masking film that lasted about 3 years. I've no idea what make it was, but it was bloody good. Nothing crept underneath it and it came off easliy.
Edited by Tony Matthews, 11 November 2009 - 16:56.
Member
Posted 10 November 2009 - 18:34
Member
Posted 10 November 2009 - 19:05
Yes indeed. My mind unfortunately got quite boggled over time which is why I don't paint that way anymore. The worst part of the film-pos painting method was that you work fairly blind. Since the majority of the painting is done on the back side of the film, you have to work from dark to light to make it read right on the front side. Using opaque gouche meant that as you added lighter tones of different colors over darker ones that it would change the value of the area. This made it hard to judge neighbor values as you built up shapes which is a hard way to render anything.
If I were to do a painting by hand ever again, I definately would give a go at Tony's method. I think using a brush would be more fun. The only reason I never used a brush was that I worked under Dave and he didn't like the paint brush. I prefer the feel of Tony's paintings much better. They have a certain richness and depth to them that is equal to none.
Member
Posted 10 November 2009 - 19:11
I don't remember that Alan - perhaps they got it after I left - bastards! Not that we were allowed to use the airbrush much, but a nice set-up, all those little recievers along the worktop under the window. I 'rescued' an early DeVilbiss compressor from MN when I left, green rather than maroon, very Victorian, but then I bought a Hydrovane, as I wanted to run air tools of it as well! I feel sorry for anyone trying to airbrush using canisters, as Mr Coleman said, the money made from mustard comes from what people leave on their plates - I reckon 90% of the air is used cleaning the brush between reloads.
I think that sraying on CS10 would be great for masking, as it has such a hard, smooth surface, and if you are using inks you don't get any 'build-up' to speak of, but I found CS2 Hot Pressed gave me the result I wanted and allowed a bit of brushwork on small detail - more easily than on CS10.
Tom, I have a deal of admiration for the way you and David Kimble worked in that fashion - mind boggling.
Member
Posted 10 November 2009 - 19:25
Very kind of you Tom. Now you have mastered the digital process, which I also admire, you may find the desire to try brush painting fading even more, because the aim is to produce the image, not so much to enjoy the process - I miss the creative process, and still want to paint, but I can't make myself do it. A combination of not being sure how I want to paint - how I want the finished painting to look - and the fear of failure, I suppose. I've just spent several weeks repairing, painting and decorating various bits of a lovely old farm house - the only sort of painting I do at the moment.
Member
Posted 10 November 2009 - 22:36
Redditch, Worcestershire is the only address I have for them Alan, if they started in Ickleford it was a long time ago... I'd forgotten, momentarily, about Barnfield - my son is doing an evening course in Digital Photography there - whenever I think of Technical Illustration at Luton Tech it is the building in the centre of Luton that springs to mind.We moved to Barnfield College in 1974 and had our own studios built with piped compressed air.
I do believe Hydrovane were from Ickleford, just outside Hitchin. Your neck of the woods.
Member
Posted 10 November 2009 - 23:14
Member
Posted 11 November 2009 - 09:07

Edited by Tony Matthews, 11 November 2009 - 09:15.
New Member
Posted 11 November 2009 - 17:46

Member
Posted 11 November 2009 - 20:50
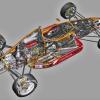
Part of the unfinished Lotus 79, I'm surprised this scanned as well as it has, as the scanner has a raised lip around the glass bed, I didn't think it would focus. However, it has, and this shows a pressed-through line drawing in the process - frozen in time - of turning into full colour. With gouache you can paint over a line and more or less depend on being able to paint the neighbouring item and covering the previous over-paint.
Advertisement

Member
Posted 12 November 2009 - 09:03


© MOTORSPORT NETWORK 2024. All rights reserved. Community Forum Software by IP.Board


